Our crew will arrive at your location each morning at around 8:30 a.m. We begin with a greeting and then immediately review the application process with you, as well as answer any questions that you have. Our mobile trucks are fully equipped with all the equipment and materials that our crew needs to flawlessly complete your flooring project.
The Epoxy Pros 5-step application process is as follows:
The preparation process is the most important step during any flooring project. The Epoxy Pros uses state-of-the-art diamond grinders and a self-contained vacuum system that creates an unbreakable mechanical bond to the substrate. Our crew will unload the equipment and then examine the concrete density to choose the most suitable diamond blades for grinding your floor.
We will then grind the surface of the entire floor, which is an important step since it profiles the substrate and opens the concrete material. Our crew will then use a hand grinder to ground down the edges.
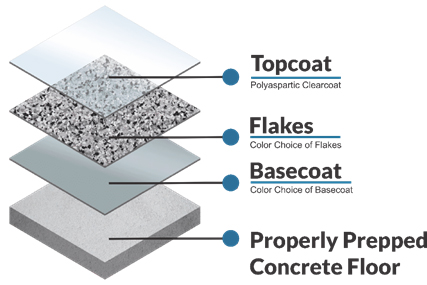
It is very important that every inch of the floor is fully prepared for the coating. The Epoxy Pros uses an epoxy basecoat with a polyaspartic topcoat. We can apply the coating to vertical surfaces such as cinder blocks, wooden baseboards, wooden steps, and foundation walls.
Included in this step, is the grinding process and the cleaning of all debris from the surface.
It is common for concrete pads to have hairline cracks, and although it is a natural occurrence, they must be opened with a diamond cutting wheel in order to fill it with a polyurea filler or mortar. The application process is fast and the filler cures in approximately 25 minutes.
The floor should be fully smooth, and all cracks must be completely invisible. It is common for floors to have salt pits or other signs of minor damage, but these spots must also be filled and ground down to achieve a flawless, smooth surface.
After we finish with the grinding process, we will vacuum the floor to make sure all dust and debris are fully removed.
The Epoxy Pros uses an epoxy basecoat with a polyaspartic top coating, which is available as a 1 or 2-day system. The system we choose will depend on the size of your floor.
With the 1-day system, you can return to regular foot traffic and regular usage the following day, with a limit of 250 pounds. With the 2-day system, you can return to regular foot traffic and usage on the second day following the application. With either system, the floor is fully cured 48 hours after completion.
We will mix the 2 components by adding pigment to the base coat chosen by our customer’s choice of pre-blended vinyl flakes. The first step is to roll the base coat onto all vertical surfaces and heavily apply the flakes for 100% coverage.
Before the base coat is applied our crew will vacuum the excess material from the floor. We will then apply the base coat to the entire floor surface.
One person from our crew will roll the coating onto the floor and a second crew member will broadcast the vinyl flakes. To provide our crew with 100% coverage, three times the amount of material is broadcast during this process.
It takes 60 minutes for the floor to cure once the entire floor is fully coated.
We will remove all the excess flake material once the coating is fully cured.
Our crew will then scrape the floor with a flat metal-edge tool to knock down any standing flakes, and to smooth out the flake base coat. After we finish scraping the floor, we will vacuum it again to remove dust and debris.
Our crew will then apply a clear topcoat using a squeegee and then back-roll it. By doing this, we will be certain that the topcoat is even and thick throughout, leaving a durable, consistent finish.
Topcoat Requirements:
The Epoxy Pros can advise you on curing times since weather and other environmental factors can cause varying curing waiting periods.
Finally, we will clean your site and load our equipment and materials back into our mobile truck.
The Epoxy Pros offers customers a 10-year limited warranty for every floor coating project that is completed. Customers receive a signed warranty certificate that includes the date of purchase and details of warranty coverage.


